You will need:
-Putty SSH client: http://www.putty.org
-An account on an Internet-accessible server that accepts SSH connections and allows connection forwarding (enabled by default)
-A popular web browser or other software that supports SOCKS communications
Step 1:
Fire up Putty and navigate to the Session Category
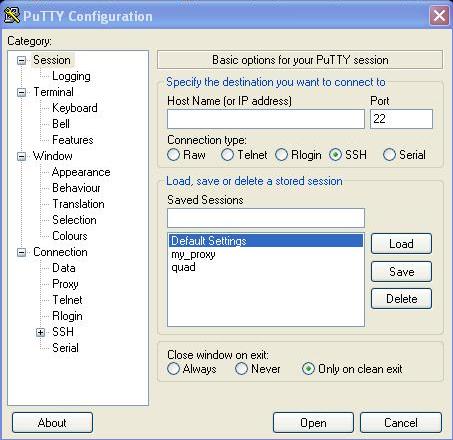
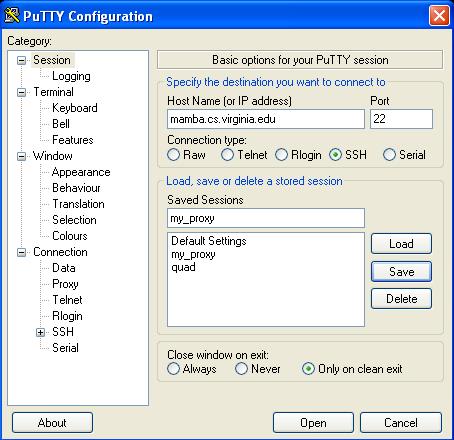
Step 2:
Enter the hostname/IP address and port of the server on which you have an account.
(Note: The default SSH port is 22)
This tells Putty how to connect to the SSH server.
Step 3:
Under the SSH->Tunnels Category
Enter the following:
Source port: 8888 (or any port of your choosing. Just be sure to remember what it is)
Destination: hostname/IP address of the server on which you have an account
Also, select the “Dynamic” radio button.
This tells Putty that, upon a successful connection, a SOCKS tunnel should be opened from a port on the computer you are using to the SSH server.

Step 4:
Click “Add”
The forwarded port is now added to the connection settings.
Step 5:
Click “Open” to start the connection
Putty will ask for your login credentials. In most cases, this will be a username and password. (For extra security and bonus cool points, have your SSH server only accept certificates)
At this point, your Putty-enabled SOCKS proxy should be active. But how do we test it out? Keep reading…
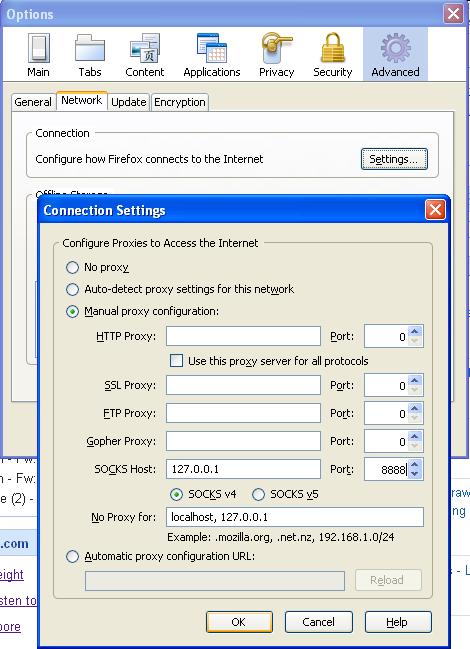
Step 6:
Fire up your web browser and navigate to its proxy connection properties menu.
For Firefox 3, it is in Tools->Options->Advanced->Network(tab)->Connection, Settings
For IE6, it is Tools->Internet Options->Connections(tab)->LAN Settings(button)->Advanced(button)
Step 7:
Find the SOCKS settings text box and enter the following:
Proxy Address/Host: localhost OR 127.0.0.1
Port: 8888 (or whatever port you decided to use in Step 3)
Ensure SOCKS Version 4 is selected
Note: DO NOT enter any other proxy settings for other protocols (this includes the “use proxy server for all protocols” option. Don’t enable it. I’m serious. If you do, things might not work correctly.)
Step 8:
Click “OK” until you’re back to your browser.
Go to http://ipchicken.com and check your IP address. It should be different from the machine you’re on. In fact, it SHOULD be the IP address of the SSH server (or whatever machine is handling its connections).
Step 9:
Pat yourself on the back. Or have your buddies do it for you– they’ll no doubt be impressed by your newfound computer skills. Enjoy browsing the web using your own personal SSH proxy.
NOTE: Although this could be useful when using a public computer– it won’t protect you from local machine monitoring tools (keyloggers, screen captures, etc). Always exercise due diligence when using untrusted computers.
-Putty SSH client: http://www.putty.org
-An account on an Internet-accessible server that accepts SSH connections and allows connection forwarding (enabled by default)
-A popular web browser or other software that supports SOCKS communications
Step 1:
Fire up Putty and navigate to the Session Category
Step 2:
Enter the hostname/IP address and port of the server on which you have an account.
(Note: The default SSH port is 22)
This tells Putty how to connect to the SSH server.
Step 3:
Under the SSH->Tunnels Category
Enter the following:
Source port: 8888 (or any port of your choosing. Just be sure to remember what it is)
Destination: hostname/IP address of the server on which you have an account
Also, select the “Dynamic” radio button.
This tells Putty that, upon a successful connection, a SOCKS tunnel should be opened from a port on the computer you are using to the SSH server.
Step 4:
Click “Add”
The forwarded port is now added to the connection settings.
Step 5:
Click “Open” to start the connection
Putty will ask for your login credentials. In most cases, this will be a username and password. (For extra security and bonus cool points, have your SSH server only accept certificates)
At this point, your Putty-enabled SOCKS proxy should be active. But how do we test it out? Keep reading…
Step 6:
Fire up your web browser and navigate to its proxy connection properties menu.
For Firefox 3, it is in Tools->Options->Advanced->Network(tab)->Connection, Settings
For IE6, it is Tools->Internet Options->Connections(tab)->LAN Settings(button)->Advanced(button)
Step 7:
Find the SOCKS settings text box and enter the following:
Proxy Address/Host: localhost OR 127.0.0.1
Port: 8888 (or whatever port you decided to use in Step 3)
Ensure SOCKS Version 4 is selected
Note: DO NOT enter any other proxy settings for other protocols (this includes the “use proxy server for all protocols” option. Don’t enable it. I’m serious. If you do, things might not work correctly.)
Step 8:
Click “OK” until you’re back to your browser.
Go to http://ipchicken.com and check your IP address. It should be different from the machine you’re on. In fact, it SHOULD be the IP address of the SSH server (or whatever machine is handling its connections).
Step 9:
Pat yourself on the back. Or have your buddies do it for you– they’ll no doubt be impressed by your newfound computer skills. Enjoy browsing the web using your own personal SSH proxy.
NOTE: Although this could be useful when using a public computer– it won’t protect you from local machine monitoring tools (keyloggers, screen captures, etc). Always exercise due diligence when using untrusted computers.


0 comments:
Post a Comment